Developers' Corner
- Tips & Tricks and Examples
- Applications & Use Cases
- Windows tricks & tips
- Linux tricks & tips
- serial device settings - switch off every possible hidden manipulation feature
- usbdev - dynamic device symlink and proper access rights
- SSH config: Host Specific Identity
- Linux: dhclient - dynamic hostname
- Linux: dhclient - dynamic mount point
- Linux: Hades Network - Allow Client To Connect Via Gateway
- Linux: How To Clone A SD Card
- Linux: Resize Raw Img File
- /sbin/reboot: Input/output error
- ProcServ: Remote Kill Via netcat
- Solution
- Hardware collection, evaluation
- Git Tips & Tricks
Tips & Tricks and Examples
-
<div style="text-align:right"><a style="font-size:smaller" href="/edit/Epics/EpicsTipsAndTricksAndExamples">edit</a></div>
<div style="text-align:right"><a style="font-size:smaller" href="/edit/Epics/SeqRecordsDelayTimingAndProcessing">edit</a></div>
- The calc record serves as a 10Hz Time reference.
- The seq record:
- is scanned every 10 s
- each of the LNKx get its input value from the calc reference, delayed by DLYx
-
 the seq record stays active until all LNKs have been processed.
- the nested second, delayed, and "PPed" seq record "seq2" doesn't delay the execution of LNK4
- LNK5 to a dummy record introduces an addditional delay, before "ai5" is "FLNKed" (Listing 1)
otherwise (LNK5 undefined) "ai4" and "ai5" do get the (almost) same time (Listing 2)
seq Records Delay Timing and Processing

> camonitor ai1 ai2 ai3 ai4 ai5 ai6
ai1                            <undefined> 0 UDF INVALID
ai2                            <undefined> 0 UDF INVALID
ai3                            <undefined> 0 UDF INVALID
ai4                            <undefined> 0 UDF INVALID
ai5                            <undefined> 0 UDF INVALID
ai6                            <undefined> 0 UDF INVALID

ai1                            2015-06-12 11:20:43.537023 10.4
ai2                            2015-06-12 11:20:45.532220 12.4
ai3                            2015-06-12 11:20:45.927412 12.8
ai4                            2015-06-12 11:20:46.723239 13.6
ai5                            2015-06-12 11:20:50.718449 17.6
ai6                            2015-06-12 11:20:51.422657 18.3

ai1                            2015-06-12 11:20:53.548024 20.5
Listing 2
> camonitor ai1 ai2 ai3 ai4 ai5 ai6
ai1                            2015-06-12 11:34:01.036987 10.4
ai2                            2015-06-12 11:34:03.032172 12.4
ai3                            2015-06-12 11:34:03.427368 12.8
ai4                            2015-06-12 11:34:04.222552 13.6
ai5                            2015-06-12 11:34:04.222568 13.6
ai6                            2015-06-12 11:34:08.923422 18.3

ai1                            2015-06-12 11:34:11.037168 20.4
- inside GSI
- git at gitorious.gsi.de:
git clone git://gitorious.gsi.de/epics-playground/seq-record.git - outside GSI
- epics-playground-seq-record-master.tar.gz: tarball
Sources
-- PeterZumbruch - 2017-03-31
<div style="text-align:right;font-size:smaller">EpicsTipsAndTricksMultipleIOCs <a href="/edit/Epics/EpicsTipsAndTricksMultipleIOCs">(edit)</a></div>
multiple IOCs
newest (2015/06) tech-talk knowledge
$ https://epics-controls.org/tech-talk/2015/msg00897.php :
https://wiki-ext.aps.anl.gov/epics/index.php/How_to_Make_Channel_Access_Reach_Multiple_Soft_IOCs_on_a_Linux_Host
or
https://wiki-ext.aps.anl.gov/epics/index.php/How_to_Configure_Channel_Access
or
https://epics-controls.org/base/R3-14/12-docs/CAref.html
describe the basic issue of reaching multiple IOCs running on the same computer
--> Need to use broadcast address.
For the command line 'caget' you need to set the EPICS_CA_AUTO_ADDR_LIST and EPICS_CA_ADDR_LIST environment variables.
For CSS, you need to set the corresponding preferences. In the UI, that's under Edit/Preferences/CSS Core/EPICS for the running instance, or better use a "plugin customization" file as described in the "Hierarchical Preferences" section of the CSS book, http://cs-studio.sourceforge.net/docbook/css_book.pdf.
The related setting would be
## File "my_settings.ini"
org.csstudio.platform.libs.epics/auto_addr_list=false
org.csstudio.platform.libs.epics/use_pure_java=true
org.csstudio.platform.libs.epics/addr_list=xx.xx.19.255 127.0.0.1
org.csstudio.platform.libs.epics/max_array_bytes=100000000
.. and then you run css like this:
css -pluginCustomization /full/path/to/my_settings.ini
Solution would be to be able to have several IOCs running on a PC. But you will be faced by the following Problems
(taken from talk of Kenneth Evans: "_Channel Access in Depth_", Kenneth Evans, Jr., March 8, 2005 as Part of the EPICS Getting Started Lecture Series, p15):
Multiple Servers on the Same Host
- Used to not be possible at all (Base 3.13)
- Now, it can be done, but there are problems
- Will get message
- cas warning: Configured TCP port was unavailable. Using dynamically assigned TCP port 45003, but now two or more servers share the same UDP port. Depending on your IP kernel this server may not be reachable with UDP unicast (a host's IP in EPICS_CA_ADDR_LIST)
- First part means clients will establish their circuit on another port than the default 5064.
- Not a problem
- Second part means unicast search requests may not get to both servers
- UDP deficiency, similar to the CaRepeater problem
- May be a problem when EPICS_CA_ADDR_LIST is used
- Determines where to search
- Is a list (separated by spaces)
- 123.45.1.255 123.45.2.14 123.45.2.108
- Default is broadcast addresses of all interfaces on the host
- Works when servers are on same subnet as clients
- Broadcast address
- Goes to all servers on a subnet
- Example: 123.45.1.255
- Use ifconfig a on UNIX to find it (or ask an administrator)
Solution 1: EPICS_CA_ADDR_LIST
EPICS_CA_ADDR_LIST EPICS_CA_ADDR_LIST, the EPICS Channel Access (Client) Address List on the client site. E.g. for MEDM:
- export
EPICS_CA_ADDR_LISTand startmedmin the same session$> exportEPICS_CA_ADDR_LIST&& medm &
Solution 2: make use of more EPICS environment variables to allow inter IOC communication
Following the thread in tech-talk Multiple IOC from 2007:It was fixed by setting the CAS Beacon Address List to the address and ports of the other IOC's CA repeater port. IOC1 EPICS_CAS_BEACON_ADDR_LIST=nnn.nnn.nnn.nnn:5071 EPICS_CA_ADDR_LIST=nnn.nnn.nnn.nnn:5070 IOC2 EPICS_CA_Server_Port=5070 EPICS_CAS_Server_Port=5070 EPICS_CA_Repeater_Port=5071 EPICS_CAS_BEACON_ADDR_LIST=nnn.nnn.nnn.nnn:5065 EPICS_CA_ADDR_LIST=nnn.nnn.nnn.nnn:5064
-- PeterZumbruch - 2018-01-08
<div style="text-align:right;font-size:smaller">EpicsTipsAndTricksCrisAxisAddtionForSeveralEpicsApplications <a href="/edit/Epics/EpicsTipsAndTricksCrisAxisAddtionForSeveralEpicsApplications">(edit)</a></div>
cris-axis addition for several EPICS applications
HOWTO build flex (libfl) for cris-axis crisv32-axis
Since some of the EPICS extensions and modules rely on libfl flex and the standard distribution of AXIS SDK doesn't contain the libfl.a this has to be added:Prerequisites
- Axis SDK
- cross compiler
Build & Installation
- set some helper variables:
       export SRC_DIR=<Source Directory>
       export DOWNLOAD_DIR=<Download Directory>
# provided cross compiler and SDK are installed here export ETRAX_DIR=<ETRAX Tools Directory> - download sources from http://sourceforge.net/projects/flex/ (version 2.5.35) via direct link to
$DOWNLOAD_DIRmkdir -p ${DOWNLOAD_DIR:?undefined} &&
wget http://prdownloads.sourceforge.net/flex/flex-2.5.35.tar.bz2?download - unpack to
$SRC_DIRmkdir -p ${SRC_DIR:?undefined} &&
cd SRC_DIR &&
tar -jxvf flex-2.5.35.tar.bz - Source
cris-axis-setup.sh,defining environment variables, e.g.AXIS_TOP_DIR, and extendingPATH, needsETRAX_DIRto be defined.or just take its main code:cd ${SRC_DIR:?undefined} &&
wget https://wiki.gsi.de/pub/Epics/EpicsTipsAndTricksCrisAxisAddtionForSeveralEpicsApplications/cris-axis-setup.sh &&
source cris-axis-setup.sholdpwd=$OLDPWD
base=$(pwd)
cd ${ETRAX_DIR:?undefined)/SDK && cd $(ls --color=never -t -1 -d devbo* | head -n 1) && . ./init_env
cd $base
cd ${ETRAX_DIR:?undefined)/ETRAX/compiler && . ./setup.sh
cd $oldpwd
cd $base
unset scriptname base oldpwd epicsDir - Change to source directory
$SRC_DIRcd ${SRC_DIR:?undefined} - Since
configureautomatically sets for cross-compilers 'ac_cv_func_malloc_0_nonnull' and 'ac_cv_func_realloc_0_nonnull' to 'no', (since it cannot check it) those have to be configured by hand:- cris-axis
-
export myTARGET=cris-axis-linux-gnu -
make clean -
./configure --prefix=${AXIS_TOP_DIR:?undefined}/target/${myTARGET:?defined}/usr --host=${myTARGET} --build=i686-pc-linux-gnu ac_cv_func_realloc_0_nonnull=yes ac_cv_func_malloc_0_nonnull=yes -
make -
make install
-
- crisv32-axis
-
export myTARGET=crisv32-axis-linux-gnu -
make clean -
./configure --prefix=${AXIS_TOP_DIR:?undefined}/target/${myTARGET:?defined}/usr --host=${myTARGET} --build=i686-pc-linux-gnu ac_cv_func_realloc_0_nonnull=yes ac_cv_func_malloc_0_nonnull=yes -
make -
make install
-
- cris-axis
Compact
export SRC_DIR=<Source Directory>
export DOWNLOAD_DIR=<Download Directory>
# provided cross compiler and SDK are installed here
export ETRAX_DIR=<ETRAX Tools Directory>
      mkdir -p ${DOWNLOAD_DIR:?undefined} &&
      wget http://prdownloads.sourceforge.net/flex/flex-2.5.35.tar.bz2?download
      mkdir -p ${SRC_DIR:?undefined} &&
      cd SRC_DIR &&
      tar -jxvf flex-2.5.35.tar.bz
            oldpwd=$OLDPWD
      base=$(pwd)
      cd ${ETRAX_DIR:?undefined)/SDK && cd $(ls --color=never -t -1 -d devbo* | head -n 1) && . ./init_env
      cd $base
      cd ${ETRAX_DIR:?undefined)/ETRAX/compiler && . ./setup.sh
      cd $oldpwd
      cd $base
      unset scriptname base oldpwd epicsDir
# crisv-axis
export myTARGET=cris-axis-linux-gnu
cd ${SRC_DIR:?undefined} &&
make clean
./configure --prefix=${AXIS_TOP_DIR:?undefined}/target/${myTARGET:?defined}/usr --host=${myTARGET} --build=i686-pc-linux-gnu ac_cv_func_realloc_0_nonnull=yes ac_cv_func_malloc_0_nonnull=yes &&
make && make install
# crisv32-axis
export myTARGET=crisv32-axis-linux-gnu
cd ${SRC_DIR:?undefined} &&
make clean
./configure --prefix=${AXIS_TOP_DIR:?undefined}/target/${myTARGET:?defined}/usr --host=${myTARGET} --build=i686-pc-linux-gnu ac_cv_func_realloc_0_nonnull=yes ac_cv_func_malloc_0_nonnull=yes &&
make && make install
-- PeterZumbruch - 09 Apr 2009
-- PeterZumbruch - 2017-03-31
<div style="text-align:right;font-size:smaller">EpicsTipsAndTricksNewIocCommand <a href="/edit/Epics/EpicsTipsAndTricksNewIocCommand">(edit)</a></div>
new IOC command
The general way how to add a new IOC command, which can be used inside the IOC Shell is described in Chapter 18.3 IOC Shell - IOC Shell Programming of the IOC Application Developer's Guide (3.14.9). Here is an example (with the help of BK) to make the commanddumpTable(mbo, dac, channel, type) available at the IOC shell.
-
application.c
#include <epicsExport.h>

/* ... */

/***************************************************************************/
static void dumpTable(int mbo, int dac, int channel, short type)
{
  /* some function code */
  /* ... */
}
/***************************************************************************/

/* Information needed by iocsh */
/* Argument definition */
static const iocshArg  dumpTableArg0 = {"mbo number",     iocshArgInt};
static const iocshArg  dumpTableArg1 = {"dac number",     iocshArgInt};
static const iocshArg  dumpTableArg2 = {"channel number", iocshArgInt};
static const iocshArg  dumpTableArg3 = {"table type",     iocshArgInt};
static const iocshArg  *dumpTableArgs[] =
{
  &dumpTableArg0,
  &dumpTableArg1,
  &dumpTableArg2,
  &dumpTableArg3
};
/* Function definition */
static const iocshFuncDef dumpTableFuncDef = {"dumpTable", 4, dumpTableArgs};

/* Wrapper called by iocsh, selects the argument types that dumpTable needs */
static void dumpTableCallFunc(const iocshArgBuf *args) {
  dumpTable(args[0].ival, args[1].ival, args[2].ival, args[3].ival);
}

/* Registration routine, runs at startup */
static void dumpTableRegister(void) {
    iocshRegister(&dumpTableFuncDef, dumpTableCallFunc);
}
epicsExportRegistrar(dumpTableRegister);
-
application.dbd
variable(mySubDebug)
...
registrar(dumpTableRegister)
-- PeterZumbruch - 08 May 2008
-- PeterZumbruch - 2018-01-08
<div style="text-align:right;font-size:smaller">EpicsTipsAndTricksUseOfMsiWithMultipleTempleateFiles <a href="/edit/Epics/EpicsTipsAndTricksUseOfMsiWithMultipleTempleateFiles">(edit)</a></div>
use of msi with multiple template files
To produce a single db file from multiple template files it is sufficient to include in the Makefile in the app/Db directory the line with the name of the db. This should be a not existing file (because it will be produced). Existing must be the corresponding substitutions file and the template file(s). In case that the substitutions file calls to a multiple template files is necessary to have an independent name from them, otherwise the generated db file will be only based on the same name template file. Be aware that none of the template files should have the same name as the substitutions file. Example: To make a db called vulom_1.db use a file vulom_1.substitutions which references for instance vulom.template, vulomreg.template, and vulomreg1.template vulom_1.substitutions:
file vulom.template {
{ PRE=HAD, NN="0", MM="1"}
}
file vulomreg.template {
{ PRE=HAD, NN="0", MM="1", CC="Del_0", AA="0", LIM="49.5", GAIN="3.3", LLIM="0"}
{ PRE=HAD, NN="0", MM="1", CC="Del_1", AA="1", LIM="49.5", GAIN="3.3", LLIM="0"}
}
file vulomreg1.template {
{ PRE=HAD, NN="0", MM="1", CC="Down_0", AA="7", LIM="15", GAIN="1"}
{ PRE=HAD, NN="0", MM="1", CC="Down_1", AA="8", LIM="15", GAIN="1"}
}
DB += vulom_1.db
additional Dependencies
Adding the line in the Makefile
vulom_1_DEPENDS ?= $(shell perl -n -e 'if (/file\s+(\w+.template)/) {print "$$1 \n";}' vulom_1.substitutions )
DB += vulom_1.db
-
If a <name> substitutions file contains "file" references to other input files, these referenced files should be made
dependencies of the created <name>.db by adding a dependency definition line:
<name>_DEPENDS = <filename1> <filename2> ...
-- PeterZumbruch - 09 May 2008
-- MartinMitkov - 2017-03-31
-- PeterZumbruch - 2018-01-08
-- PeterZumbruch - 2017-03-31
Applications & Use Cases
-
The idea is to place here some (external) EPICS applications and use cases (or links to them).
- Getting started using Stream Devices
- A well documented introduction of the PANDA group at Bochum, Germany, of using StreamDevice accessing exemplarily an I-7565 USB/CAN Converter
http://panda-wiki.gsi.de/cgi-bin/view/DCS/EPICSstartUsingStreamDev
-- PeterZumbruch - 07 Apr 2010
Windows tricks & tips
-
<div style="text-align:right"><a style="font-size:smaller" href="/edit/Epics/WindowsTricksTips">edit</a></div>
%FOREACH{"item" in="TippsWindowsResizeRawImgFileUsingVirtualBox"}%
- e.g. to resize to 15.5GB, approx. size 15500
Resize Raw Img File Using VirtualBox
Following the recommendation on http://raspberrypi.stackexchange.com/questions/4943/resize-image-file-before-writing-to-sd-card:set VBOXMANAGE="C:\Program Files\Oracle\VirtualBox\VBoxManage.exe"
IF NOT EXIST %VBOXMANAGE% (
echo %VBOXMANAGE% does not exist ... exiting)
)
ELSE (
IF EXIST input.vdi ( %VBOXMANAGE% closemedium disk input.vdi --delete)
IF EXIST output.vdi ( %VBOXMANAGE% closemedium disk output.vdi --delete)
IF EXIST output.img (%VBOXMANAGE% closemedium disk output.img)
REM use without .img
set /p INPUT_NAME="Enter input file name without .img: ";
set OUTPUT_NAME=%INPUT_NAME%_resized
set /p OUTPUT_SIZE="Enter Size (MB) (e.g. 15000): "
ECHO "========================================================================="
%VBOXMANAGE% convertfromraw %INPUT_NAME%.img input.vdi -format VDI --variant Standard
ECHO "========================================================================="
%VBOXMANAGE% createhd --filename output.vdi --size %OUTPUT_SIZE% --format VDI --variant Standard
ECHO "========================================================================="
%VBOXMANAGE% clonehd input.vdi output.vdi --existing
ECHO "========================================================================="
%VBOXMANAGE% clonehd output.vdi output.img --format RAW
copy output.img %OUTPUT_NAME%.img
%VBOXMANAGE% closemedium disk input.vdi --delete
%VBOXMANAGE% closemedium disk output.vdi --delete
%VBOXMANAGE% closemedium disk output.img
)
-- WikiGuest - 1970-01-01
%NEXT{"item"}% %FOREACH{"item" in="TipsWindowsHowToCloneASDCard"}%
Windows: How To Clone A SD Card
<div style="text-align:right"><a style="font-size:smaller" href="/edit/Epics/TipsWindowsHowToCloneASDCard">edit</a></div> Following the help of page https://startingelectronics.org/articles/raspberry-PI/ten-things-raspberry-PI chapter 10. This video View on YouTube → shows how to clone a SD card in Windows-- WikiGuest - 1970-01-01
%NEXT{"item"}%
-- WikiGuest - 1970-01-01
Linux tricks & tips
-
<div style="text-align:right"><a style="font-size:smaller" href="/edit/Epics/LinuxTricksTips">edit</a></div>
- Output settings:
- -opost
- do not post-process output
- -onlcr
- do not translate newline to carriage return-newline
- Local settings:
- -isig
- do not enable interrupt, quit, and suspend special characters
- -icanon
- do not enable erase, kill, werase, and rprnt special characters
- -iexten
- do not enable non-POSIX special characters
- -echo
- do not echo input characters
- -echoe
- do not echo erase characters as backspace-space-backspace
- -echok
- do not echo a newline after a kill character
- -echoctl
- do not echo control characters in hat notation ('^c')
- -echoke
- kill all line by obeying the
echoctlandechoksetting - 19200
- sets the speed to 19200 Bit/s
- Prerequisites
- you have to have admin rights.
- How to
-
- edit/create
/etc/udev/rules.d/99-serial-permissions.rules
- add the follwing line for general includes
SUBSYSTEMS=="usb", ATTRS{idVendor}=="0403", SYMLINK+="$env{ID_SERIAL}", GROUP="users", MODE="0666"
creates for every connected device of vendor id0403a symbolic link/dev/to the connected device
- for special devices those lines can be added in addition
SUBSYSTEMS=="usb", ATTRS{idVendor}=="0403", ENV{ID_SERIAL}=="FTDI_FT232R_USB_UART_A100dQ2B", SYMLINK+="hadcon2", GROUP="users", MODE="0666"
                     SUBSYSTEMS=="usb", ATTRS{idVendor}=="0403", ENV{ID_SERIAL}=="FTDI_FT232R_USB_UART_A600801P", SYMLINK+="olimex", GROUP="users", MODE="0666"
- for special devices (e.g. HadCon2) those lines can be added in addition
-
SUBSYSTEMS=="usb", ATTRS{idVendor}=="0403", ENV{ID_SERIAL}=="FTDI_FT232R_USB_UART_A100*", RUN+="/usr/bin/stty -F /dev/$kernel -opost -onlcr -isig -icanon -iexten -echo -echoe -echok -echoctl -echoke 115200 "
-
SUBSYSTEMS=="usb", ATTRS{idVendor}=="0403", ENV{ID_SERIAL}=="FTDI_FT232R_USB_UART_A801*", RUN+="/usr/bin/stty -F /dev/$kernel -opost -onlcr -isig -icanon -iexten -echo -echoe -echok -echoctl -echoke 115200 "
-
- add the follwing line for general includes
- to find out the IDs of connected systems
udevadm info --export-db| grep FTDI| grep ID_SERIAL
- Finally reload rules and trigger a reconnect:
           udevadm control --reload-rules
          udevadm trigger
- edit/create
- Links
-
- "Writing udev rules"
- http://reactivated.net/writing_udev_rules.html
- udev
- https://wiki.ubuntuusers.de/udev/
- "Tutorial on how to write basic udev rules in Linux"
- https://linuxconfig.org/tutorial-on-how-to-write-basic-udev-rules-in-linux
- connecting to a specific host using a different identity file and user
$> cat ~/.ssh/configHost private.host.com User myname Hostname host.com IdentityFile ~/.ssh/private-identity Host public.host.com User anotherName Hostname host.com IdentityFile ~/.ssh/public-identity Host git.host.com User git Hostname host.com IdentityFile ~/.ssh/git-identity - allows to replace:
- by
ssh host.com -l myname -i ~/.ssh/private-identityssh host.com - commands which internally use ssh but do not allow to pass ssh options, e.g.
gitgit clone git.host.com
-
- with root privileges
-
~/raspi.imgis the location and file name of the image file. -
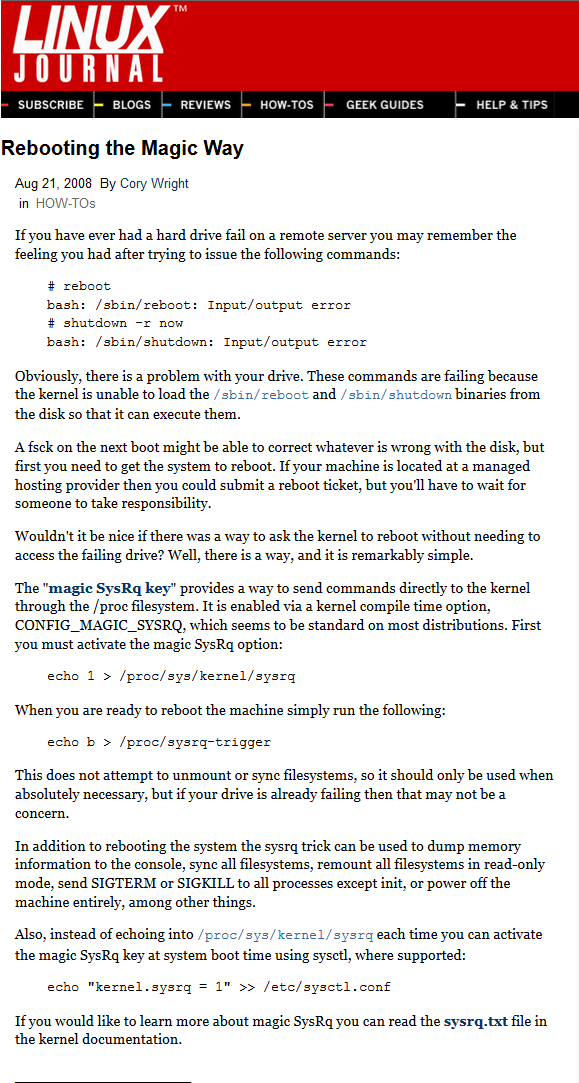
/dev/mmcblk0is the SD card device on the Linux system. - http://www.linuxjournal.com/content/rebooting-magic-way
- http://www.buha.info/showthread.php?56521-sbin-reboot-Input-output-error
serial device settings - switch off every possible hidden manipulation feature
$> stty -F /dev/ttySx -opost -onlcr -isig -icanon -iexten -echo -echoe -echok -echoctl -echoke 19200
-- PeterZumbruch - 2020-11-09
usbdev - dynamic device symlink and proper access rights
udev/udevadm allows to automatically assign (fixed) symbolic links for USB devices connected to the system pointing the current /dev entry point.
-- PeterZumbruch - 2020-11-09
SSH config: Host Specific Identity
Using ssh config files in ~/.ssh/config allows to specify per host / host alias different user/identity to connect with and more necessary options. Using the features of theconfig file of ssh in ~/.ssh one can specify host specific ssh options, including varying identities and users.
from: http://www.gelato.unsw.edu.au/archives/git/0611/31044.html
Example: -- PeterZumbruch - 2020-11-09
Linux: dhclient - dynamic hostname
Using dhclient exit hooks scripts allows to set e.g. the hostname dynamically
Based on the articles:
and its own origin
dhclient and its scripting capabilities on enter and exit hooks allows to react on dynamic network environments.
Provided you have root privileges this can be achieved by creating a script file hostname created in /etc/dhcp/dhclient-exit-hooks.d/ (on Debian), which is sourced by dhclient after having updated/received its DHCP informations.
#!/bin/sh
   # Filename:     /etc/dhcp/dhclient-exit-hooks.d/hostname
   # Purpose:      Used by dhclient-script to set the hostname of the system
   #               to match the DNS information for the host as provided by
   #               DHCP.
   #

   # Do not update hostname for virtual machine IP assignments
   if [ "$interface" != "eth0" ] && [ "$interface" != "eth1" ] && [ "$interface" != "wlan0" ]
   then
           return
   fi

   if [ "$reason" != BOUND ] && [ "$reason" != RENEW ] && [ "$reason" != REBIND ] && [ "$reason" != REBOOT ]
   then
      return
   fi

   echo dhclient-exit-hooks.d/hostname: Dynamic IP address = $new_ip_address
   hostname=$(a=$(host $new_ip_address) || { false; } && { echo -n $a | cut -d ' ' -f 5 | cut -d "." -f 1; true; }) || unset hostname &&
   echo ${hostname?} > /etc/hostname &&
   hostname $hostname &&
   export HOSTNAME=$hostname &&
   echo dhclient-exit-hooks.d/hostname: Dynamic Hostname = $hostname
sudo curl -s https://wiki.gsi.de/pub/Epics/TipsLinuxDhclientDynamicHostname/_etc_dhcp_dhclient-exit-hooks.d_hostname -o $file &&
  sudo dos2unix $file &&
  sudo chmod a+r $file
dhclient
-- PeterZumbruch - 2020-11-09
Linux: dhclient - dynamic mount point
Using dhclient exit hooks scripts allows to set a mount point depending on the network environment, in this example for the HADES setup
Based on the articles:
and its own origin
dhclient and its scripting capabilities on enter and exit hooks allows to react on dynamic network environments.
Provided you have root privileges this can be achieved by creating a script file mount_var_diskless created in /etc/dhcp/dhclient-exit-hooks.d/ (on Debian), which is sourced by dhclient after having updated/received its DHCP informations.
#!/bin/sh
    # Filename:     /etc/dhcp/dhclient-exit-hooks.d/mount_var_diskless
    # Purpose:      Used by dhclient-script to set mount HADES's var/diskless filesystem
    #               from either the local net (preferred) or the GSI network
    #

    # Do not update hostname for virtual machine IP assignments
    if [ "$interface" != "eth0" ] && [ "$interface" != "eth1" ] && [ "$interface" != "wlan0" ]
    then
        return
    fi

    if [ "$reason" != BOUND ] && [ "$reason" != RENEW ] && [ "$reason" != REBIND ] && [ "$reason" != REBOOT ]
    then
            return
    fi

    var_diskless_hades=192.168.100.50
    var_diskless_gsi=140.181.75.158
    var_diskless_path=/var/diskless/dreamplug
    var_diskless_mount=/var/diskless/dreamplug

    echo dhclient-exit-hooks.d/mount_var_diskless: new domain-name-servers: $new_domain_name_servers

    echo "$new_domain_name_servers" | grep -q $var_diskless_hades && var_diskless_addr=$var_diskless_hades || var_diskless_addr=$var_diskless_gsi

    #clean up, but only different mounts
    grep -v "$var_diskless_addr:$var_diskless_path" /etc/mtab | grep -q "$var_diskless_mount" && umount $var_diskless_mount

    #mount
    [ -d "$var_diskless_mount" ] || mkdir -p $var_diskless_mount
    grep "$var_diskless_addr:$var_diskless_path" /etc/mtab | grep -q "$var_diskless_mount" || mount $var_diskless_addr:$var_diskless_path $var_diskless_mount

    echo dhclient-exit-hooks.d/mount_var_diskless: mounted $var_diskless_addr:$var_diskless_path

    unset var_diskless_hades
    unset var_diskless_gsi
    unset var_diskless_path
    unset var_diskless_mount
chmod a+r /etc/dhcp/dhclient-exit-hooks.d/mount_var_diskless
dhclient -v
-- PeterZumbruch - 2020-11-09
%FOREACH{"item" in="TipsLinuxHadesNetworkAllowClientToConnectViaGateway"}%
Linux: Hades Network - Allow Client To Connect Via Gateway
To allow clients to connect outside of Hades network:
ip r a default via 192.168.100.90 dev eth0
-- WikiGuest - 1970-01-01
%NEXT{"item"}% %FOREACH{"item" in="TipsLinuxHowToCloneASDCard"}%
Linux: How To Clone A SD Card
Following the help of page https://startingelectronics.org/articles/raspberry-PI/ten-things-raspberry-PI chapter 10. This video View on YouTube → shows how to clone an SD card in Linux using the dd command line application. The command for copying an SD card to an image file on your computer is: sudo dd if=/dev/mmcblk0 of=~/raspi.img sudo dd if=~/raspi.img of=/dev/mmcblk0 -- WikiGuest - 1970-01-01
%NEXT{"item"}% %FOREACH{"item" in="TippsLinuxResizeRawImgFile"}%
Linux: Resize Raw Img File
see: http://www.vk3erw.com/index.php/16-software/33-raspberry-pi-how-to-resize-sd-card-image-- WikiGuest - 1970-01-01
%NEXT{"item"}% %FOREACH{"item" in="TippsLinuxRebootingTheMagicWay"}%
/sbin/reboot: Input/output error
-- WikiGuest - 1970-01-01
%NEXT{"item"}% %FOREACH{"item" in="TippsLinuxProcServRemoteKillViaNetcat"}%
ProcServ: Remote Kill Via netcat
ProcServ usually needs a login to its port to execute a "CTRL+X" sequence to kill/restart the current child process.
Thanks to this cmdline it is also able without.
Thanks to J.Michel / M.Traxler, afaik.
Solution
Assuming that procServ is running its telnet session on port 12345 on localhost
echo -en "\x18" | netcat -w1 localhost 12345;
-- WikiGuest - 1970-01-01
%NEXT{"item"}%
-- WikiGuest - 1970-01-01
Hardware collection, evaluation
- 6030 used by Wuppertal group of CBM as alternative to WuT
- up-to-now good experiences
- less expensive than WuT
- EXSYS EX-6030 1 channel
- EX-6030, Manual
- local: E700_EXSYS_EX_6030_DB_MULTI.pdf: EXSYS_EX6030, 1 channel, data sheet
- EX-6030, data sheet
- local: E700_EXSYS_EX-6030_HB_DEU.pdf: EXSYS_EX6030, 1 channel, manual
- EX-6030, Manual
- EXSYS EX-6034, 4 channel
- EX-6034, Manual
- local: E700_EXSYS_EX6034_DB_MULTI.pdf: EXSYS_EX6034, 4 channel, data sheet
- EX-6034, data sheet
- local: E700_EXSYS_EX6034_HB_DEU.pdf: EXSYS_EX6034, 4 channel, manual
- EX-6034, Manual
- Used by HADES, EE/KS, CBM
- Observations
- - in connection with network settings, sometimes quiet stubborn → clumsy hardware reset necessary
- - CBM @ COSY: showed in a radioactive environment (cave), (network) connection problems, 1 out of 3 ports operational
- + good remote programming capabilities
- + internal buffer, might overcome latencies
Introduction
The idea is to collect recommended hardware tools in use and experiencesserial ComPorts/ComServer - LAN ⇔ RS232
EXSYS
Experience and Users
Documentation
W&T, WuT, Wiesemann & Theis
Experience and Users
Documentation
-- PeterZumbruch - 2012-11-07
Git Tips & Tricks
-
<div style="text-align:right"><a style="font-size:smaller" href="/edit/Epics/GitTricksTips">edit</a></div>
- with the help of
- git submodule add
- git submodule
- git submodule init
- git clone
- git submodule update
- create new branch
- go into sub directory
- git init
- create remote bare repository
- push to (final) remote repository
- delete local sub directory and
- replace by add submodule pointing to remote,
- commit
- checkout and test
- merge new branch into current "master"
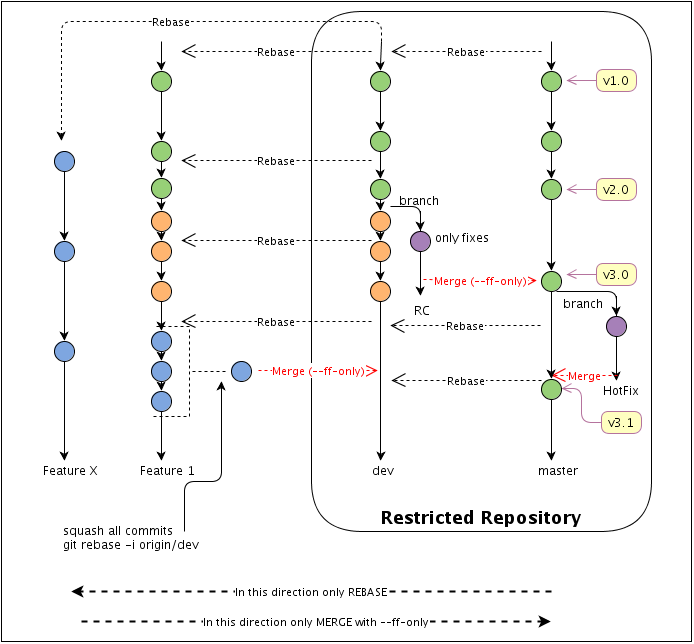
- inspired by https://github.com/HB-GSI/CSPP/wiki
- which itself is inspired by the FAIRRoot WorkFlow This shows the following Workflow Diagram
- (https://raw.githubusercontent.com/AnarManafov/GitWorkflow/master/GitWorkflow_fig1.png)
-
Importing cvs into git, including history
How to "Import a CVS repository into a bare git repository"
# External CVSROOT,  e.g. scs@lx-pool.gsi.de:/misc/hadesprojects/slowcontrol/cvsroot/

URL_CVSROOT_EXTERNAL=<[User@]external CVSROOT directory>,

CVSROOT_LOCAL=<local CVSROOT directory>

# Git repository path: e.g. "hadesprojects-slowcontrol.git"

GIT_TARGET_DIR=<New Git Repository>,

# CVS Module to import
MODULE=<CVS Module to extract>


[ ! -z "$CVSROOT_LOCAL" ] mkdir -p "$CVSROOT_LOCAL" &&

[ ! -z "$URL_CVSROOT_EXTERNAL" ] && rsync --progress -a "$URL_CVSROOT_EXTERNAL/" $CVSROOT_LOCAL

[ ! -z "$GIT_TARGET_DIR" ] && GIT_TARGET_REPOSITORY=${GIT_TARGET_DIR%%.git}.git && mkdir -p $GIT_TARGET_REPOSITORY &&

cd $GIT_TARGET_REPOSITORY &&

git init --bare &&

[ ! -z "$MODULE" ] && time git cvsimport -i -o cvshead -p xv -v -k -d $CVSROOT_LOCAL -C $GIT_TARGET_REPOSITORY  $MODULE >&/tmp/cvsimport.log ||

echo "import of module \'$MODULE\' of CVS repository \'$URL_CVSROOT_EXTERNAL\' into \'$GIT_TARGET_REPOSITORY\' failed"
-- PeterZumbruch - 2014-11-03
Submodule
git submoduleadding a submodule to a git directory
retrieving a repository with submodules
converting a repository into projects with submodules
(H.Brand)-- PeterZumbruch - 2014-11-03
Git Workflow
<div style="text-align:right"><a style="font-size:smaller" href="/edit/Epics/GitTricksTipsWorkflow">edit</a></div>Possible Git Workflow
-- PeterZumbruch - 2014-11-14
-- PeterZumbruch - 2014-11-14
-- PeterZumbruch - 11 Jun 2015
-- PeterZumbruch - 2017-03-31
| I | Attachment | Action | Size | Date | Who | Comment |
|---|---|---|---|---|---|---|
| |
cris-axis-setup.sh | manage | 826 bytes | 2009-04-09 - 11:11 | PeterZumbruch | cris-axis-setup.sh: Bash script for cris-axis setup |
Topic revision: 2017-03-31, PeterZumbruch
Ideas, requests, problems regarding GSI Wiki? Send feedback | Legal notice | Privacy Policy (german)