|
|
You are here: GSI Wiki>CSframework Web>CSSubProjects>LVDimInterface (2010-06-24, DietrichBeck)
LabVIEW-DIM Interface
This document refers to package DimWrapper version >= 1.00 and package LVDimInterface version >= 1.10.Introduction
DIM is a communication system for distributed / mixed environments, it provides a network transparent inter-process communication layer based on TCP/IP. DIM has been developed at CERN and is available for VMS, Unix, Linux, Windows, OS9, LynxOS and VxWorks. Available interfaces are Fortran, C, C++ and Java. For more information about DIM see http://dim.web.cern.ch/dim/. We have written a LabVIEW interface for DIM. By this, LabVIEW can be linked to all platforms supported by DIM. Basically, our LabVIEW interface is just a wrapper around the "dim.dll" which is part of the official DIM distribution maintained by Clara Gaspar (thanks a lot!). This means, that the DIM functionality itself is encapsulated within the "dim.dll". The LabVIEW DIM interface does not re-implement DIM. It just makes the DIM functionality available in the LabVIEW environment. Before you start working with the LabVIEW DIM interface, it is highly recommended to have a look at the documentation of DIM itself. Check the DIM introduction and the description of the DIM tools. For in depth knowledge of the "dim.dll", consult the documentation of the C interface.Supported Operating Systems
The LabVIEW-DIM interface is supported on MS-Windows, Linux (tested on Suse) and PharLap (LabVIEW RT).Remark: Connecting LabVIEW and EPICS
By using DIM, LabVIEW and EPICS applications can be linked together. The LabVIEW DIM interface is provided on THIS web-site. For more information on the interface from EPICS to DIM, have a look here. An overview on how-to connect EPICS and LabVIEW is given here.Principle
The architecture of the LabVIEW DIM driver is depicted below. The "my application" (top) can be, as an example, a DIM server/client that is part of a multi-threaded LabVIEW application. This DIM server uses the VIs provided by this "instrument" driver (not shown). The "instrument" driver uses the "DimWrapper" shared library (dll or so).
Technically, the intermediate step (via the DimWrapper library) is required, since one cannot reqister LabVIEW code as a callback routine to DIM. When updated service data or command data is being received, the DimWrapper library buffers the data and sends an event (a so-called "occurrence") to the LVDimInterface which obtains the buffer from the library and dispatches it via LabVIEW message queues or notifications.
There are a few particularites (like the usage of the Motorola endian), which require re-compiled version of the dim libraries itself. The package DimWrapper provides those recompiled shared libraries "myDimStd.dll" (Windows) and "libmydim.so" (Linux). The few minor modifications that are required to recompile DIM concern the files dim.h and dis.c, which are contained in the package DimWrapper as well.
The "my application" (top) can be, as an example, a DIM server/client that is part of a multi-threaded LabVIEW application. This DIM server uses the VIs provided by this "instrument" driver (not shown). The "instrument" driver uses the "DimWrapper" shared library (dll or so).
Technically, the intermediate step (via the DimWrapper library) is required, since one cannot reqister LabVIEW code as a callback routine to DIM. When updated service data or command data is being received, the DimWrapper library buffers the data and sends an event (a so-called "occurrence") to the LVDimInterface which obtains the buffer from the library and dispatches it via LabVIEW message queues or notifications.
There are a few particularites (like the usage of the Motorola endian), which require re-compiled version of the dim libraries itself. The package DimWrapper provides those recompiled shared libraries "myDimStd.dll" (Windows) and "libmydim.so" (Linux). The few minor modifications that are required to recompile DIM concern the files dim.h and dis.c, which are contained in the package DimWrapper as well.
Getting Started
In order to use DIM with LabVIEW one has to do two things:- Download and install DIM from CERN (DIM is under copyright of CERN and GPL licensed). Please follow the instructions on the DIM web site (like defining the environment variable DIM_DNS_NODE). Make sure your DIM installation is working properly:
- Start the DIM name server "dns.exe".
- Start the DIM tree browser "DimTree.exe" or the DIM diagnostics tool "DID.exe". If you are able to see your DIM name server "DIS_DNS@nodename", everything should be fine.
- Download the packages LVDimInterface and DimWrapper (copyright of GSI and GPL licensed). Install the software by unzipping the zip file. Make sure everything is working properly:
- Windows only: Before starting LabVIEW, define an environment variable DIMWRAPPER_LOGPATH and set it to the name of a folder (like "F:\myStuff\tmp"), to which a log file "dimWrapper.log" will be written. If the environment variable is not defined, the log file "dimWrapper.log" will be written somewhere.
- PharLap only:
- Manually transfer the files "libDimWrapperSPL.dll" and "myDimSPL.dll" (to be found in ...\LVSCC\C\GPL\Projects\DimLVEvent\bin) to the folders "/ni-rt/system" of the LabVIEW-RT system.
- Define environment variables by adding the following entries to the ni-rt.ini file:
- [ENVIRONMENTSTRINGS]
- DIM_DNS_NODE=your_dim_name_server_host_name_or_ip
- DIM_HOST_NODE=your_labview_rt_host_name_host_name_or_ip
- Open the ...\lib.lib\DIMLVEvent\LVDimInterface\LVDimInterface.VI-Tree.vi in the LabVIEW development system.
- LabVIEW might try to search for shared libraries of another platform (like searching for a "dll" on Linux or a "so" on Windows. You may press "cancel" to stop the search.
- LabVIEW might try to search for for a shared library of your platform. In that case you have to find the library.
- Make sure, the DIM_LV_VI-Tree.vi is executable.
- Show the block diagram by pressing ctrl+E.
- Double-Click and run the "LVDimInterface.dim_operate.vi"
- Double-Click and run the "LVDimInterface.application example client.vi"
- Double-Click and run the "LVDimInterface.application example serv buffer.vi".
- Change to the "DimTree.exe" application (or "DID.exe"). You should be able to see the DIM server provided by the server. In DIMTree.exe it shows up as "test28@nodename". By exploring the DIM tree, you will discover one service "testService"
- When stopping the examples, please do so by pressing the "STOP" button on it's front panel. This allows the DIM server to shut down properly.
Some advice on using the interface
For programming applications, two interfaces, or APIs, exist. The native "LVDimInterface" and the more convenient "DimIndicators" interface. The "LVDimInterface" interface is good for high performance and when many (thousands, ..., millions, ...) DIM services are used. The "DimIndicators" is a bit easier to use but has less good performance and does not allow managing lots of services.Native interface ("LVDimInterface")
An example of a "native" DIM client is depicted below. The application creates a message queue (or a notifier) and subscribes to a DIM service using "dic_info_service". Please note, that the reference of the message queue is required as an input parameter when registering the service. Then, in a loop, the DIM client waits to receive service data via the message queue. Either there is no new data ("timed out") or data is being received. In case data is being received, it is checked whether there is "NOLINK" (the service is not available). If the service is available, the received service data is typecasted to the appropriate data type (here: I32) and displayed. When the application is stopped by pressing the "stop" button, it finally releases the services by calling "dic_release_service".
Please not the following:
The application creates a message queue (or a notifier) and subscribes to a DIM service using "dic_info_service". Please note, that the reference of the message queue is required as an input parameter when registering the service. Then, in a loop, the DIM client waits to receive service data via the message queue. Either there is no new data ("timed out") or data is being received. In case data is being received, it is checked whether there is "NOLINK" (the service is not available). If the service is available, the received service data is typecasted to the appropriate data type (here: I32) and displayed. When the application is stopped by pressing the "stop" button, it finally releases the services by calling "dic_release_service".
Please not the following: - Please note, that one can subcribe to many DIM services using the same message queue, since each subscribed service is identified via a callback ID (the callback ID is obtained when subscribing to a service [see upper blue wire] and can be also be obtained from the "dim unfold" VI [not shown in this example]).
- The application is responsible for cleaning up the resources. If the application subscribed to a service, it must release the service. If an application declared a service, it must remove the service. Thus, a LabVIEW VI implementing a DIM server or a DIM client must not be stopped by clicking on the red "Abort Execution" button.
- The above loop is no polling. When waiting on DIM service data in the message queue, you could even set the timeout (in this example 2000 milliseconds) to the value of "-1" indicating to wait forever. Then, the loop in the above example would only iterate if new service data is received (or "NOLINK").
Convenient GUI interface ("DimIndicators")
An example of the more convenient DIM interface is depicted below. This application uses the more convenient "DimIndicator" library, which is also part of the LabVIEW Dim interface. First, it subscribes to a DIM service by specifying the service name and the reference of the GUI element "data". Then, in the loop, it waits to receive service data by using a LabVIEW event structure that is waiting on a change of the GUI element "data". Whenever new service data is received, it is displayed. When the application is stopped, it releases the DIM service.
Please note the following:
This application uses the more convenient "DimIndicator" library, which is also part of the LabVIEW Dim interface. First, it subscribes to a DIM service by specifying the service name and the reference of the GUI element "data". Then, in the loop, it waits to receive service data by using a LabVIEW event structure that is waiting on a change of the GUI element "data". Whenever new service data is received, it is displayed. When the application is stopped, it releases the DIM service.
Please note the following: - This convenient interface is just based on "LVDimInterface" interface.
- (The "LVDimInterface" library is fast, since it receives service data via message queues or notifiers.)
- The "DimIndicators" library will receive service data by a dispatcher, that writes the service data to GUI elements. This has fundamental consequences.
- In LabVIEW, GUIs (so-called front panels) run in their own GUI thread.
- "Normal" LabVIEW code is executed in other thread(s).
- Writing data from a "code thread" onto an element of a front panel, requires sitching the thread in LabVIEW. This costs time.
- To conclude, don't use the convenient interface "DimIndicators" when good performance is required.
Performance
The performance has been measured using three machines. Two Windows PC ("WinPC1/2", WinXP-SP2, Intel Dual Core @ 2.5GHz, 1GBit/s) and a Linux PC ("LxPC", Suse 11.2, Pentium IV @ 2.6GHz, 100MBit/s). The client was typically compiled into an executable and the server was always run in the LabVIEW development system. Depicted below are performance measurements for the LabVIEW DIM interface.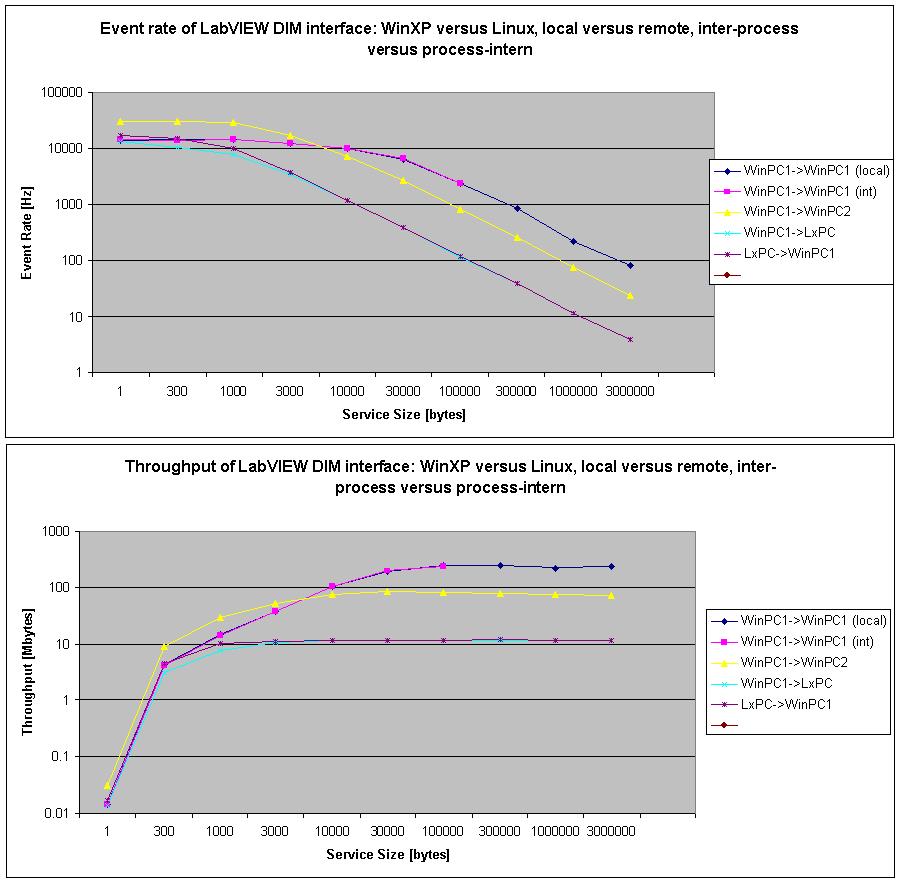 The following is observed:
 - Across the network. For small service sizes, the update rate is 15-30kHz. For the 100MBit/s interface of the Linux PC, the network is completely saturated at service sizes of a few kByte. For larger service sizes, the throughput is only determined by the bandwidth of the network (100MBit/s). The two Windows PCs have a network interface of 1GBit/s. A troughput of 80MBytes/s is achieved, which is about 80% of the bandwidth of the network.
- Local machine. It does not matter, if client and server are in the same process (an undocumented DIM feature for small service sizes) or run in two processes. The maximum event rate roughly halfened to 15kHz compared to the event rate of 30kHz that is achieved between two different PCs. Here, the architecture of the PC or OS is the limiting factor, which can't digest the high rate of interrupts or events, if client and server run on the same machine. However, the maximum troughput for larger service sizes via the loopback device is increased to 250MBytes/s, which is a factor of three higher than for the value (80MByte/s) achieved between the two Windows PCs.
Download and documentation
- The LabVIEW-DIM interface is available at SourceForge. Download the following for the most recent version:
- Don't forget to download DIM.
Please login to edit this topic
Topic revision: r17 - 2010-06-24, DietrichBeck
- User Reference
- BeginnersStartHere
- EditingShorthand
- Macros
- MacrosQuickReference
- FormattedSearch
- QuerySearch
- DocumentGraphics
- SkinBrowser
- InstalledPlugins
- Admin Maintenance
- Reference Manual
- AdminToolsCategory
- InterWikis
- ManagingWebs
- SiteTools
- DefaultPreferences
- WebPreferences
- Categories
Ideas, requests, problems regarding GSI Wiki? Send feedback | Legal notice | Privacy Policy (german)